Repost – Kodak UltraMax Test

This is a re-post of an article I had on my old blog site. It was a popular one even though it wasn’t about black and white film photography. Whenever I can I like to encourage new photographers to try film and this article is a good example of how to get really good images from some really cheap film. Because this was an older post some of the links to external sites may not work.

I have a few more posts planed around how to shoot, process, print, scan and the whole film workflow in coming posts, so check back soon. Enjoy the re-post.

———————————–

Disclaimer: This is not a scientific test, my results may be different than yours and results may vary. 

I have ordered some of the new Kodak Portra 400 film and can’t wait to give it a spin. I have seen some posts on a few other blogs that have shown how wide the exposure latitude of the new film is. You can see some good examples over at Twin Lens Life. They are some great film shooters in the Riverside area. I have also seen a test of Fuji X-tra 400 consumer film that showed how much exposure latitude it has over at Figital Revolution. All films are different and behave differently, that’s the beauty of film. Knowing what you want to get right out of the camera and knowing what film will get you there instead of working for hours in photoshop to get there is a great way to work.

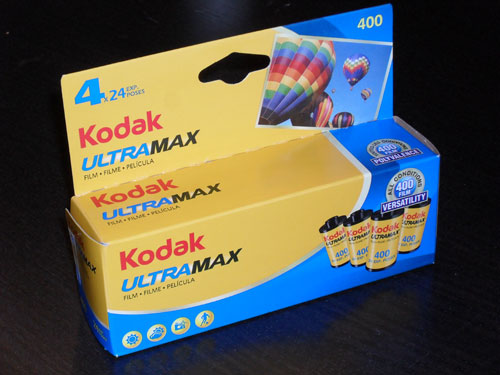
For my example I chose to shoot with some Kodak Ultramax 400. It’s easy to get your hands on and I figure that if someone wanted to start shooting film for the first time, or go back to it for kicks, they would be likely to pick some of this up and start shooting. It breaks down to about $2.50 a roll, not expensive and easy on the wallet.


Inexpensive color negative film
Kodak UltraMax 400 4 pack @ 24 Exposures for each roll. Single rolls retail for $2.99 each online today.

What I did on my first roll is to expose the first frame at 50 iso and then move each frame after that up one stop, all the way to 6400 iso. I did this so I could find the “sweet spot” to set my iso on my camera. You might be saying “But the box says 400 iso, don’t you set it at 400?”. The short answer is maybe. Just because the box speed says 400 doesn’t mean that you get the best results at 400. In the other examples from Twin Lens Life and Figital Revolution you can see that the films performed really well at just about all speeds. That’s right, you can shoot those films like you can with digital and move the iso around! The Kodak Ultramax however, doesn’t perform so great at 400 or higher (again these are my results, yours may be different). You can see my examples below.

Test exposers of Kodak UltraMax 400 35mm film
Examples of Kodak UltraMax shot at different exposures to determine the best ISO and settings to use with the film.

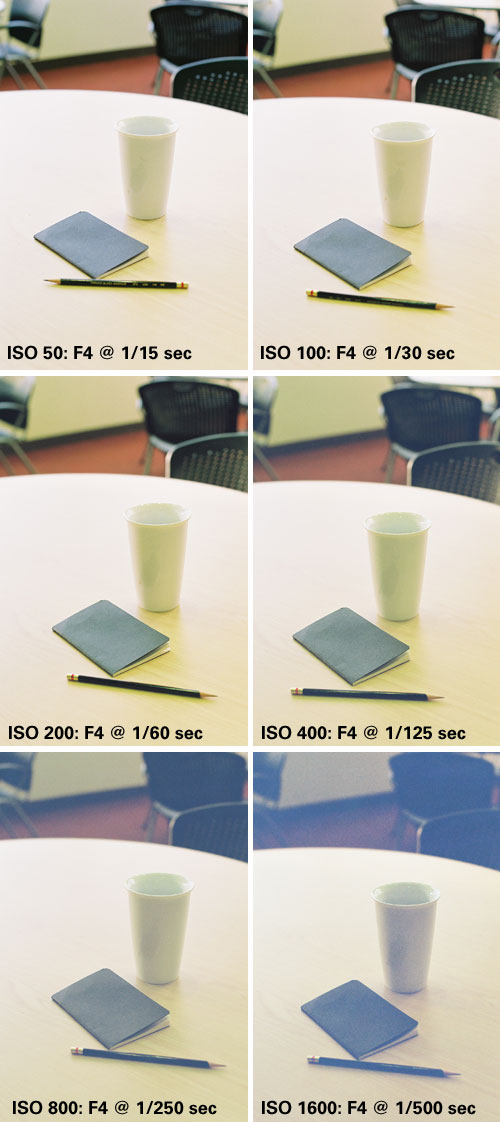
As you might be able to see, 400 iso is about the max this film can shoot at. It seems that the film starts to flatten out in contrast and the grain starts to get bigger at 400 iso. If a person didn’t know this and was excited to “try film” and shot this at box speed they might be a bit disappointed and think that all film looks like this. Now that I know how this film behaves with my shooting style and camera system I will be shooting this film at 100 iso not 400. The grain structure, color saturation and the blacks seem to be real nice at 100 iso and it still gives me about 2 stops + or – for error and I will still get a nice exposure. If you want to get into shooting film and you chose this film just for “testing it out” you would probably be better off setting your iso at 100 or 200 to start out. I think you will like your photographs more and it wouldn’t discourage you from shooting some more.

Choosing a Composition

Last January, while is was planning my trip to Australia, I was really looking forward to some great opportunities to photograph the opera house in Sydney. In one of my previous posts about being prepared to photograph while traveling I talked about how I tried to plan and be prepared to photograph the opera house during a fireworks display. Needless to say it didn’t work out as well as I had hoped. I was in luck though, I had a few other ideas in mind for photographing the opera house and a few days to get it done.

The opera house is one of those famous landmarks that is photographed all the time. Thousands of people take photos of it. Because the vantage points available to shoot the opera house are limited, many of the photos look the same. I wanted to capture my vision of the opera house, not just the same photo everyone else had. Don’t get me wrong, there are a lot of fantastic photos of it, but I wanted to look hard for something different. Something that was mine.

Storm over Sydney Opera House
Storm over Sydney Opera House. Pentax ME Super, 24mm f2.8, Arista.EDU 400 ISO film

With several days to make my photos, I was able to watch how the light moved throughout the day. I could follow the weather to see how it would change the scene. I got a pretty good sense of the rhythm of the harbor while I was there. Armed with my observations I knew a distinct image would come down to composition.

I always edit my composition in the view finder. Simplify, simplify, simplify. Making sure there is nothing in the composition that did not need to be, is always my goal. I loath cropping my images. For a wide angle shot I had to wait for many of the boats to move clear of my composition. Using a long exposure made for an exercise in patience. Composing for simple lines that create a restful image, is another thing I always try to achieve. Thanks to a great coastal line and the fantastic architecture it wasn’t hard to see for the opera house.

Sails of the Sydney Opera House
Sails of the Sydney Opera House. Pentax ME Super, 24mm f2.4, Arista.EDU 400 iso film

Changing up the composition a bit, I wanted to get the pattern and lines of the architecture of the building itself. Almost an abstract view of the opera house. Maybe this isn’t a very original image but the haze in the air made the sky turn to a creamy white that complemented the white rooftops of the opera house. This high key image removes any distraction and lets the viewer focus on the repetitive nature of the lines in the architecture. Repetition in design.

Overall I am really pleased with the images I was able to create from this trip. There were many that didn’t make the cut but a handful of them are real keepers.

Some Images from Buenos Aires

In my last post, about being prepared when doing some travel photography, I talked a little bit about my short time in Sydney, Australia. I will have more to say about Sydney in following posts. In this post I wanted to talk a little bit about the first stop on my trip, Buenos Aires. To be honest, this was the first time I was able to travel out of the country. Unless going to Tijuana for the day counts. I had no idea what to expect.

The Puerto Madero commercial district of Buenos Aires, Argentina.
The Puerto Madero commercial district of Buenos Aires, Argentina. Pentax ME Super, 24mm F2.8, Arista.Edu 400


Buenos Aires is a visually inspiring city. Once I made it through the stern faced man in customs I made my to the taxis to get a lift into the city center. With all the windows down the summer heat blowing in all the windows, we made our way down the freeway with the shiny steal and glass buildings of downtown Buenos Aires in the distance. Concrete buildings stacked with balconies covered in drying cloths and satellite dishes whizzed by the window. My photo mind was really stimulated.

Puente de la Mujer, Buenos Aires
Puente de la Mujer, Buenos Aires. iPhone

The architecture in the city center is wonderful. From old european looking buildings with narrow stone paved streets to new sparkeling sky scrappers.  I was excited to get some nice black and white photos of the area. I only had a few days to spend in Buenos Aires and I was limited to the area I could get too on foot. Luckily for me I was in a really cool area for photographing. I was staying in the Puerto Madero commercial district, where the famous Puente de la Mujer bridge is.

Puente de la Mujer, Buenos Aires
Puente de la Mujer, Buenos Aires. Pentax ME Super, 24mm F2.8, Arista.EDU 400

I was able to get out a few evenings and get some long exposures of the bridge. The weather was great and the area was full of activity with great dining and things to do. Above is one of the final images I made before I left for Sydney.

Black and white is the first step to abstraction