Tag Archives: black and white photography

Walking on the beach with some 35mm Kentmere 400 (and a little Tri-x)

In the summer of 2022 I made a quick trip to Wilmington, NC. I was there to help some family members pack up and move out of town. It was a quick in and out over a weekend. I knew I would have one evening to myself so I planned on going down to Kure Beach to make some black and white photographs of the sand and surf.

Kure Beach, NC
Rippling sands in between the grass on Kure Beach, NC. (Nikon N90s, Nikkor 24-35 AF, Kentmere 400, Xtol 1:1)

After a long hot couple of days of packing and loading I grabbed my gear with about 2 hours before sunset and headed out to Kure Beach. I knew there was a pier on the beach and some vehicle access but I had not been there before, so I didn’t really know what to expect. The sky was clear so there was no hope of getting a moody sky over the ocean. I had to work with what I had. I wasn’t disappointed when I arrived.

Kure Beach, NC sand ripples
Ripples in the sand at Kure Beach (Nikon N90s, Nikkor 24-35 AF, Kentmere 400, Xtol 1:1)

The sun was long and golden, but setting pretty fast and getting softer and softer as my time on the beach went on. I started out with a roll of Kentmere 400. I had not shot this film before and wanted to give it a try to see how it held up. I normally shoot Kodak Tri-X, but I was looking for a new film to switch to because the cost of Tri-X has gotten a bit high for me to just throw in the camera and shoot.

After looking at the spec sheet of Kentmere 400 and the curve that Ilford provides I thought it could be a promising replacement. I love the way Tri-X has some separation from the mid tones from the blacks. Something about it is just fantastic. I was hoping Kentmere 400 could get close. All the other films I have tried up to this point were either too even (flat) in their tonal rendition or too expensive.

Kure Beach, NC sand ripples
Sand ripples in the grass at Kure Beach, NC (Nikon N90s, Nikkor 24-35 AF, Kentmere 400, Xtol 1:1)

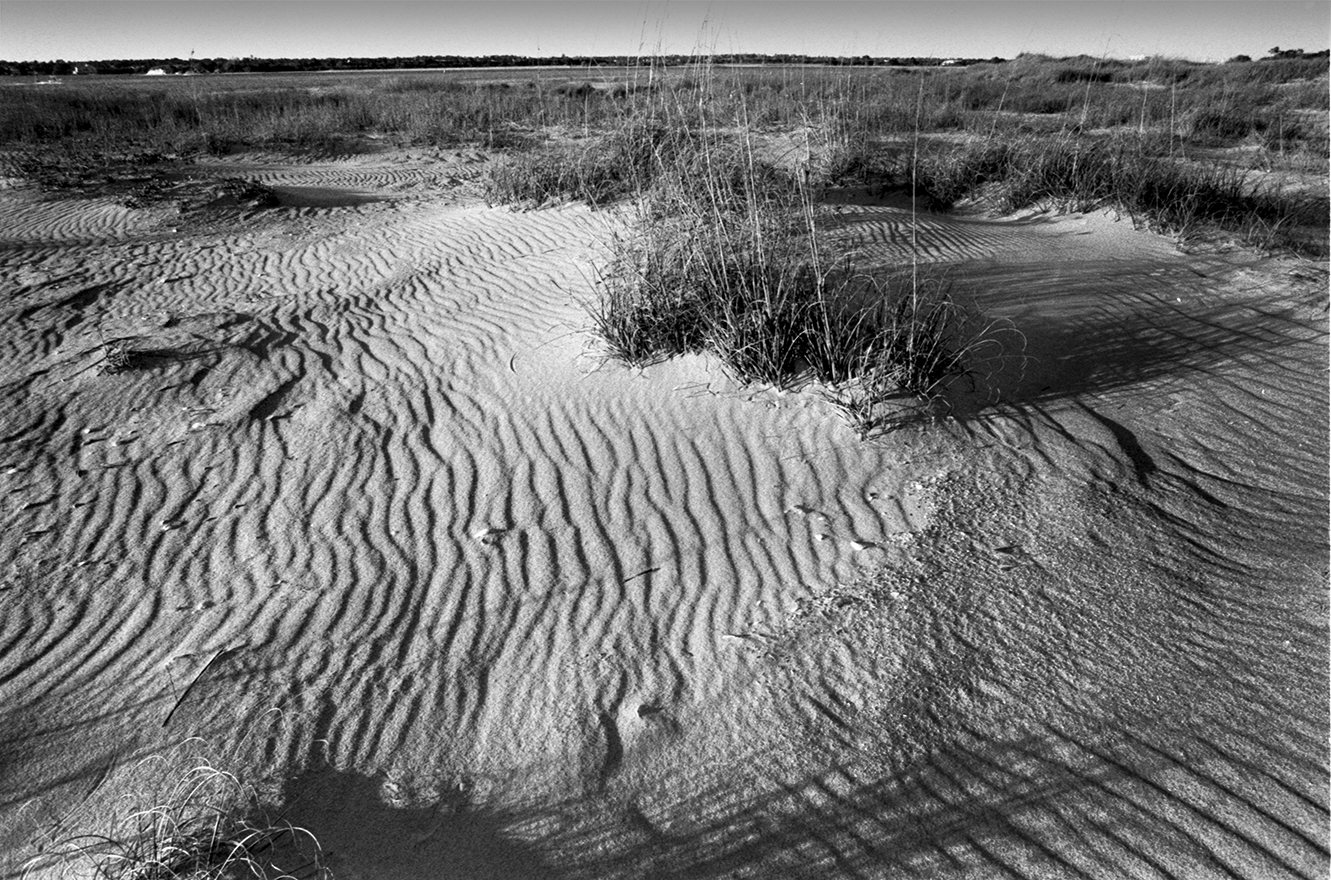
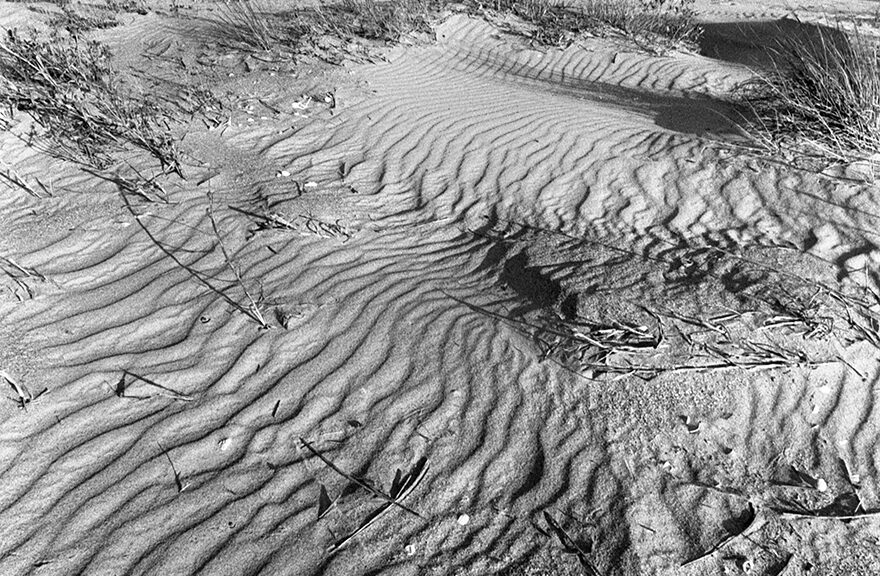
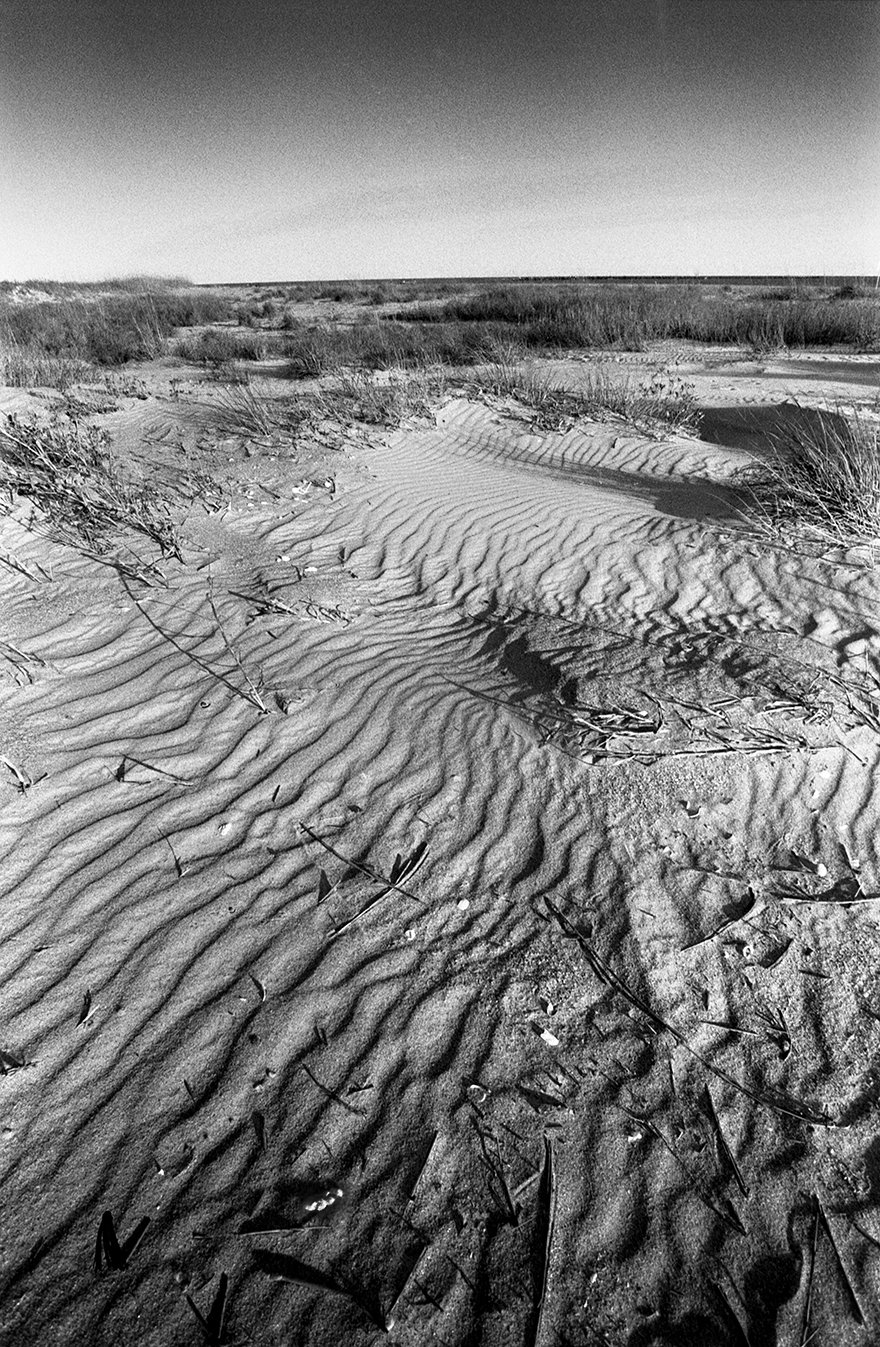
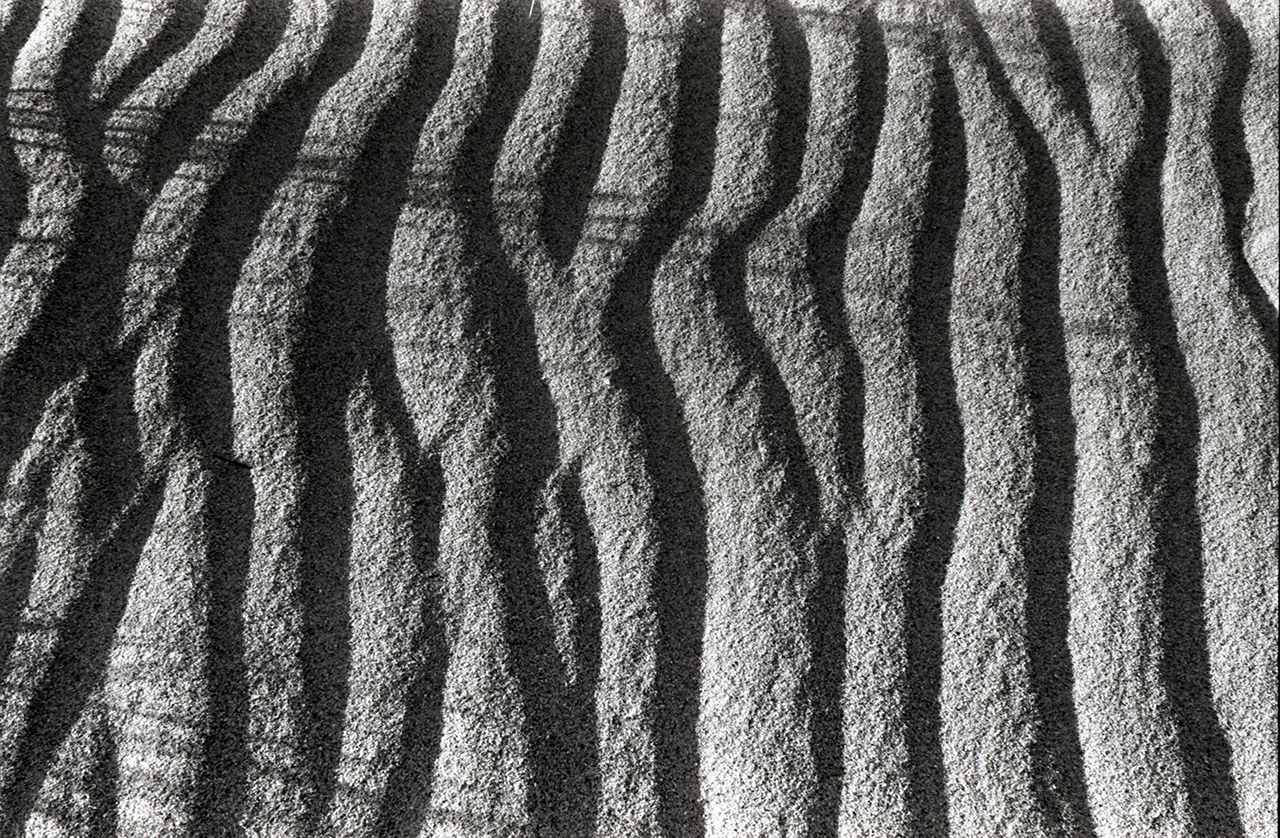
I started shooting the sand and the grass as the sun started heading down casting long raking light across the ripples revealing wonderful patterns and texture. I had to keep in mind to make sure I didn’t just walk over the sand and leave footprints all over, ruining any possible compositions. Metering was tricky for sure but I used the matrix meter on the shadow areas of the beach and decided to let the Kentmere 400 put the highlights where it wanted. I have to say I was pretty pleased with how this film handled it.

kite boarder Kure Beach, NC
Kite boarders race across the surf at Kure Beach, NC. (Nikon N90s, Tokina 300 f4 AT-X AF, Kentmere 400, Xtol 1:1)

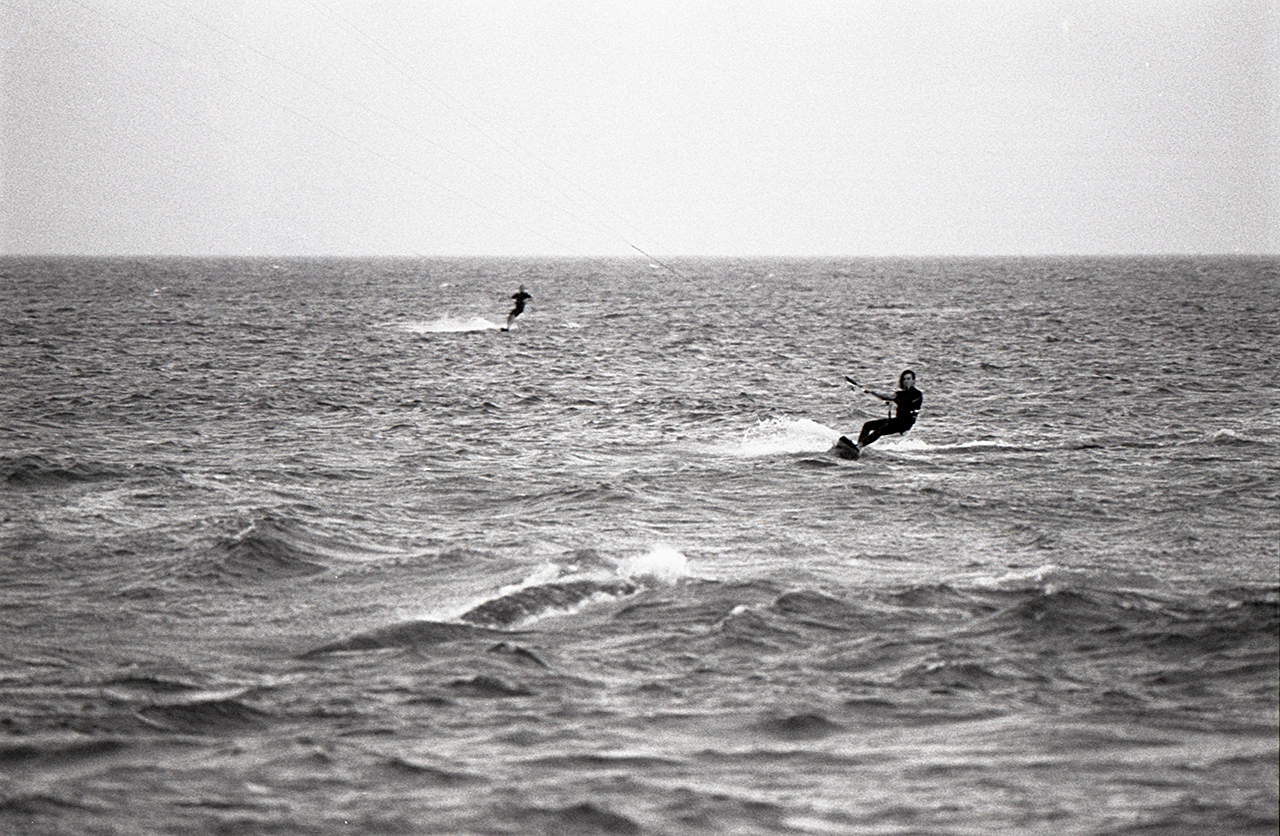
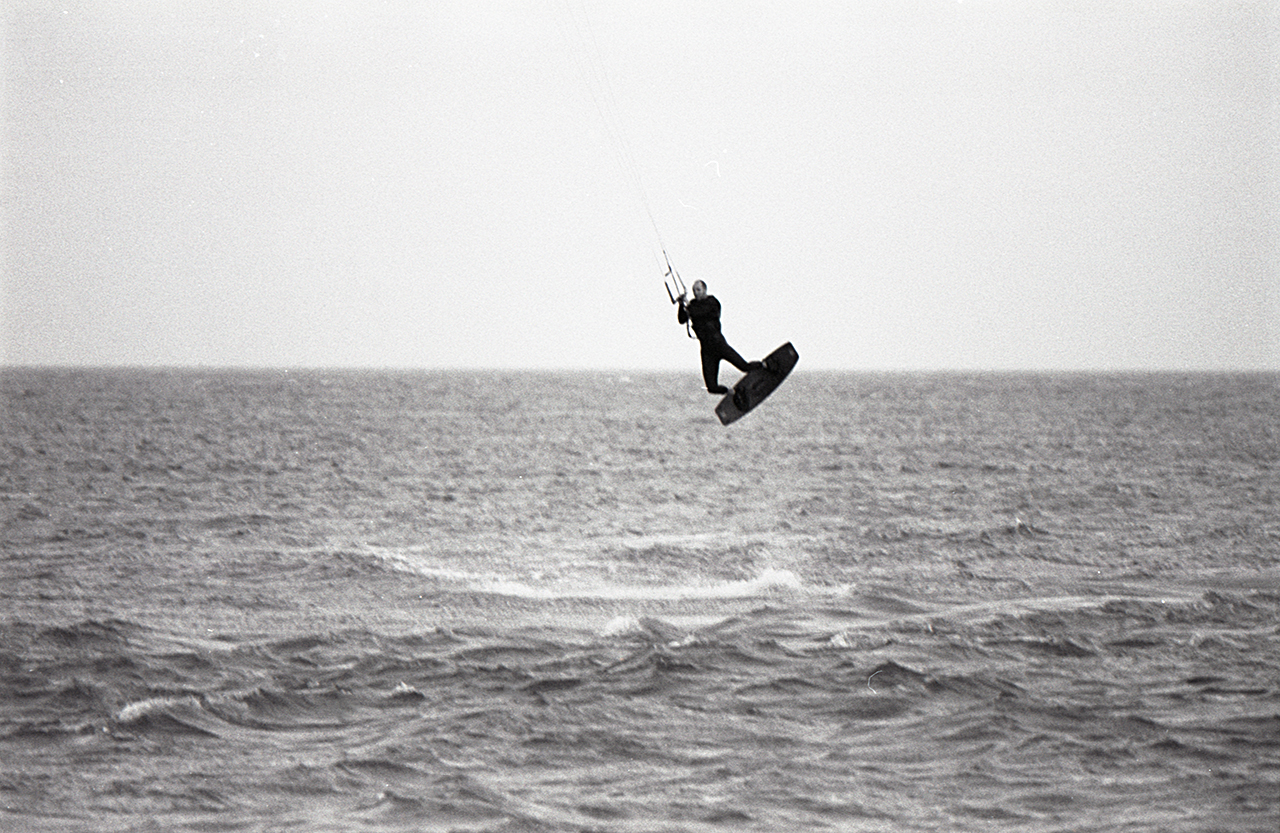
Once I was done with the sand and grass I started down the beach. There were a dozen or so kite surfers out jumping and carving the waves. What cool thing to watch. I stopped and pulled out my tripod and swapped my lens for my 300mm Tokina prime. Once I got set up these guys saw me and started showing off. What a treat. I was loosing some light as the sun kept dropping and my shutter speeds were just on the edge of too slow but I managed to get a couple acceptable shots.

kite surfer jumping in the air
Kite surfer jumping in the air over the waves at Kure Beach, NC. (Nikon N90s, Tokina 300 f4 AT-X AF, Kentmere 400, Xtol 1:1)

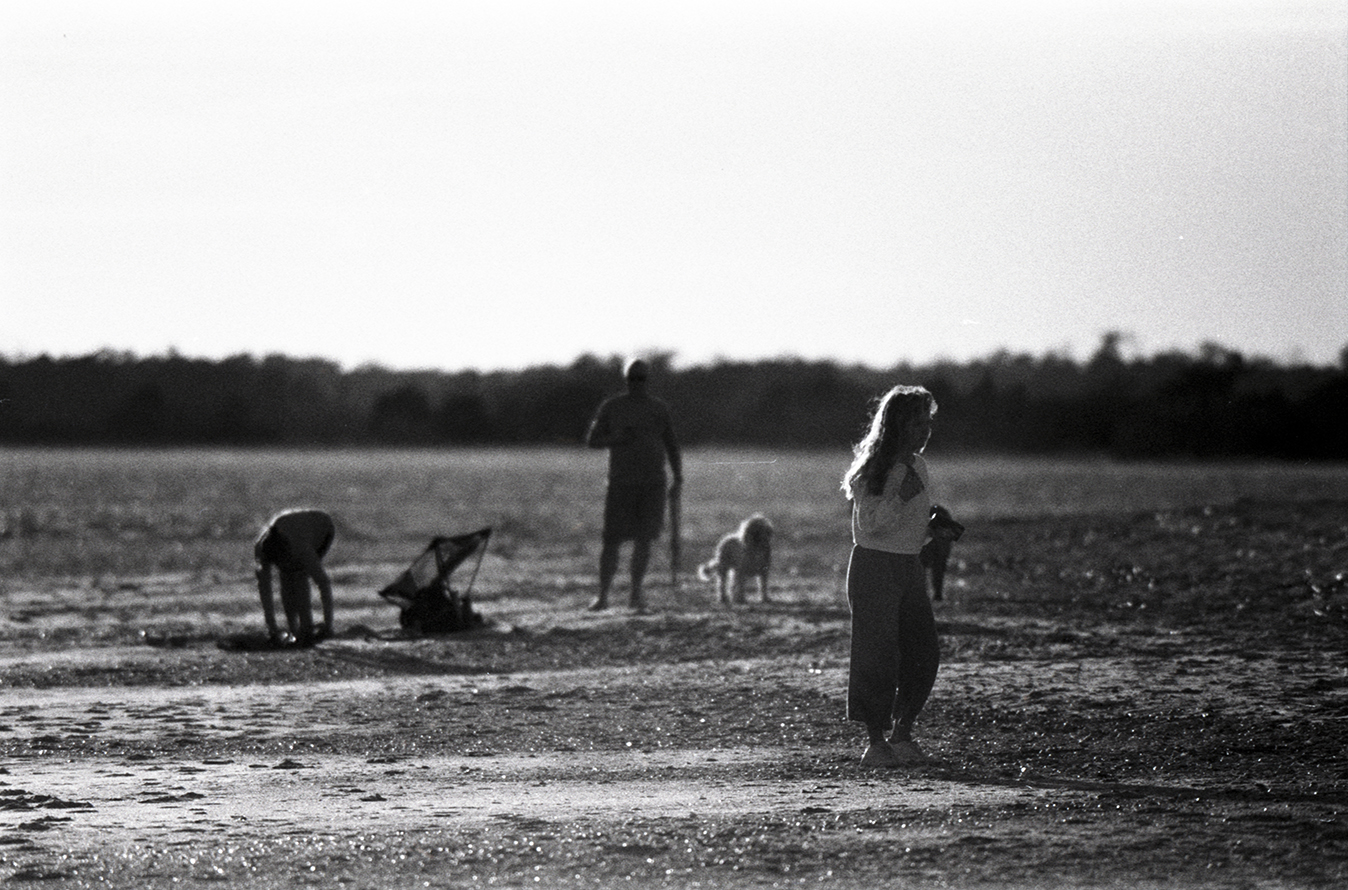
There wasn’t many people on the beach that evening but I wanted to test the limits of the Kentmere with a backlit silhouette shot of some people walking on the beach. I am a sucker for back lit black and white photographs. I hung out a little, while the kite surfers were starting to come in for the day. Up the beach, with the sun almost at their backs, was a family doing some beach combing. Perfect. I kept the 300mm on and swiveled my camera around on the tripod and made a few exposures. I metered for the sky and stopped down one stop and took some shots.

beach combers Kure Beach, NC
Family of beach combers on Kure beach, NC. (Nikon N90s, Tokina 300 f4 AT-X AF, Kentmere 400, Xtol 1:1)

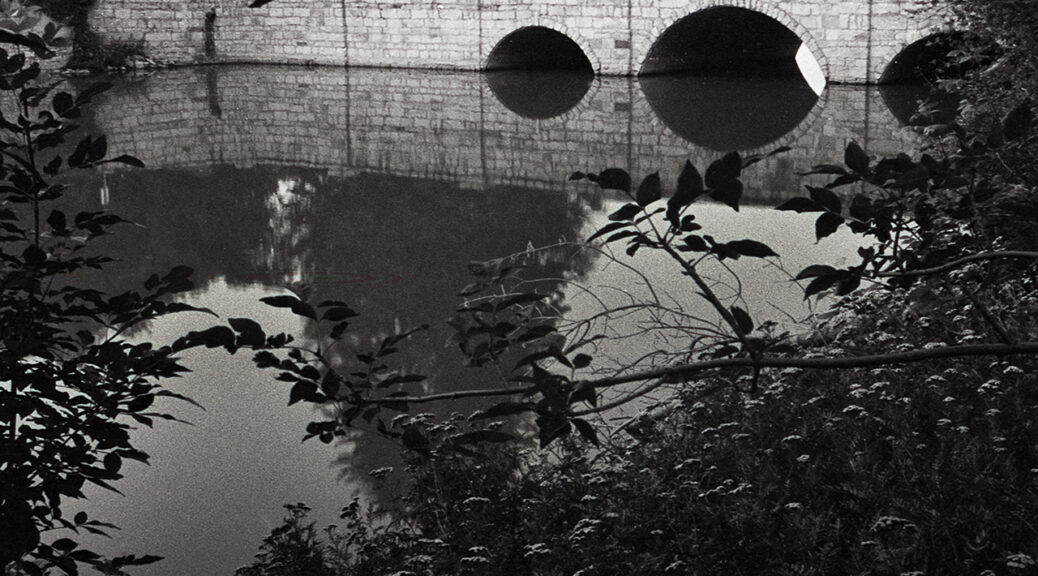
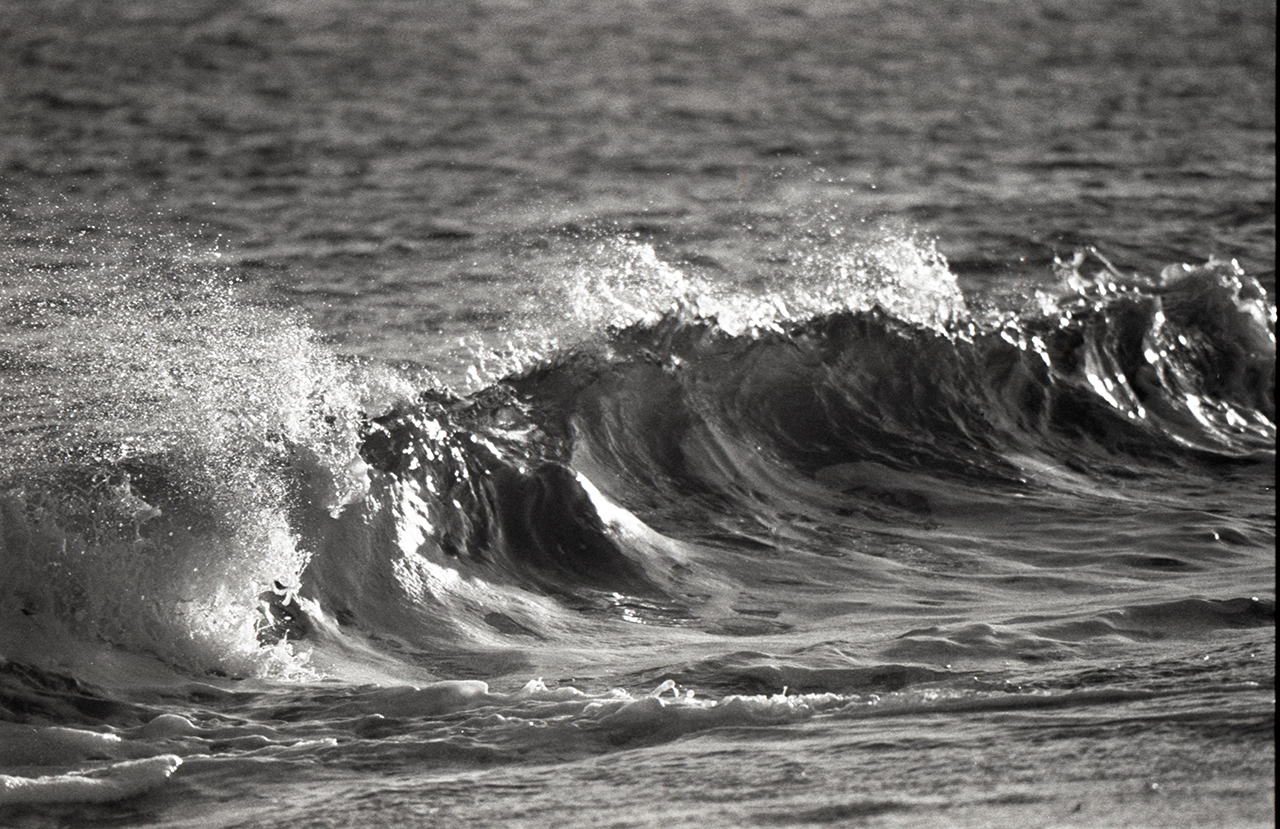
I knew I wanted to head down the beach to the Kure Beach Pier for some minimal long exposure shots. It was a little bit of a walk so I packed up and started down the beach. I remembered seeing some amazing wave photographs by some photographers I follow on social media and thought I would try to get some images of the waves on my way down to the pier. The waves weren’t much to look at compared to the giant ones I have seen but why not… So I shot a bunch of frames as I walked. It was fun.

waves at Kure Beach, NC
Waves rise and fall onto the beach at Kure Beach, NC. (Nikon N90s, Tokina 300 f4 AT-X AF, Kentmere 400, Xtol 1:1)

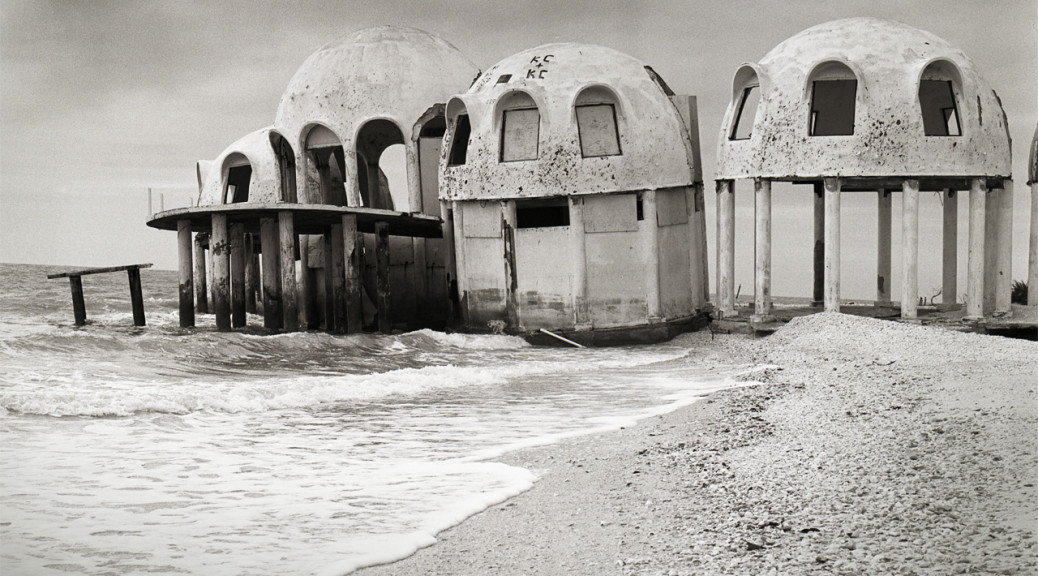
By the time I got down to the pier I shot through all of my Kentmere 400. I had to reload with Tri-X. With my Nikon reloaded I started taking stock in what the pier had to offer. The sun had set, and the last of the light was fading. Lights on the pier came on and it was a beautiful evening on the beach. I made some images on either side of the pier but nothing that excited me. Then I decided to go under the pier for that long look down the pylons.

Kure Beach Pier
Soft long exposure under the Kure Beach Pier. (Nikon N90s, Nikkor 24-35 AF, Kentmere 400, Xtol 1:1)

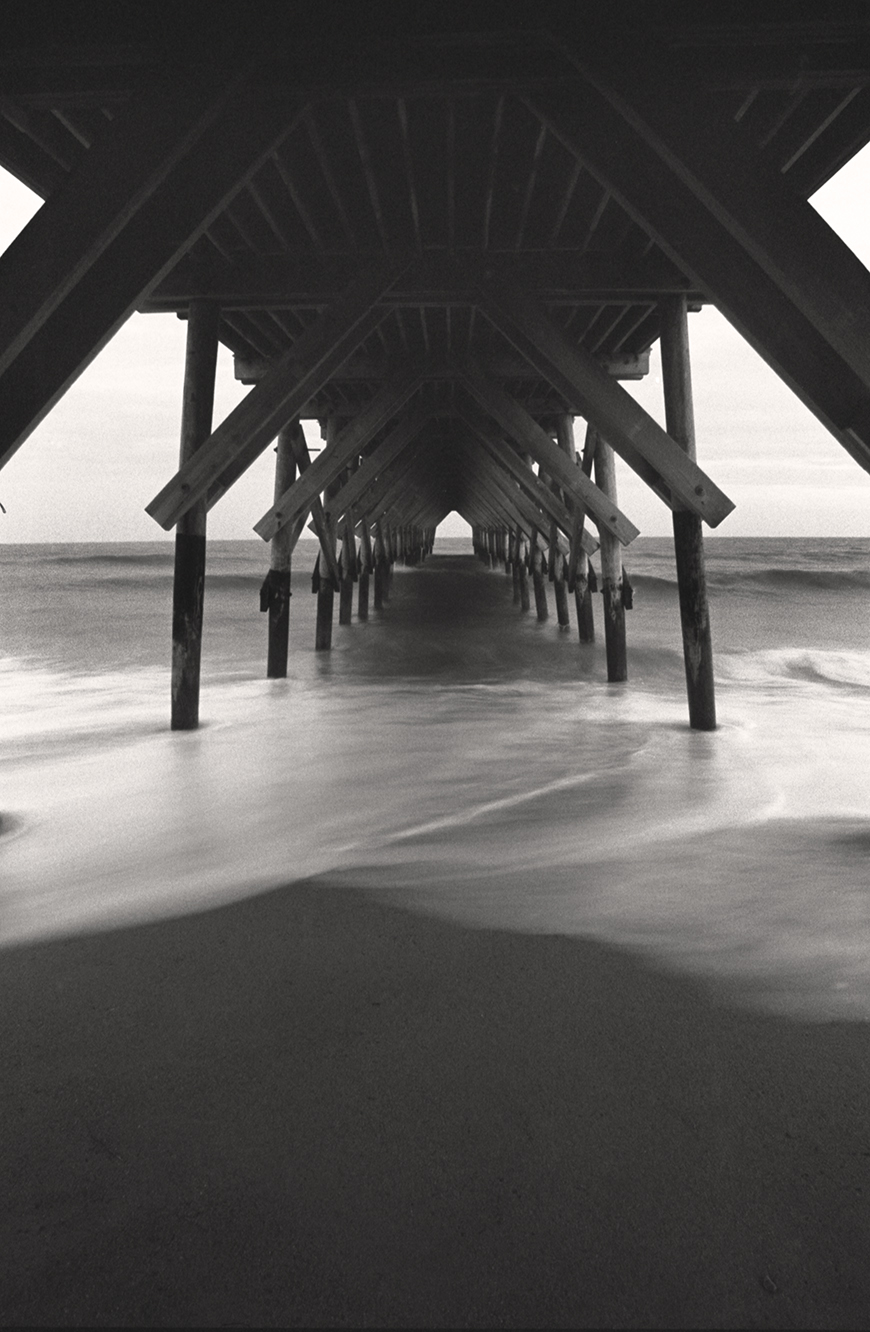
I set up directly in the middle of the pylons looking down the pier out to sea. I just loved the way the pier made a little house shape at the very end. Nice piece of interest to direct the eye. Directly behind me were some teenagers hanging out in some hammocks they strung up between the pylons. Right behind me… like 3 feet behind me. I made my meter reading in camera, calculated reciprocity and started shooting with my cable release. I wanted something smooth but still some view of the waves instead of the totally flat ghosting of the water so I kept my shutter speed on the shorter side. The image above is my favorite of the series I captured.

What to I think about Kentmere 400 along side of Tri-X? I have to say that I really liked it. I wanted to find a black and white film that would fit in with my existing development process that gave me similar results. Kentmere 400 in Xtol 1:1 is pretty close to Tri-X in my view. Contrast and tonal range is very similar. The grain structure is very similar too. I was happy enough with my results I ordered a bulk roll of the Kentmere 400. I will do some more experimenting on development times with the Kentmere 400 to see if I can get a closer look to Tri-X but I think if I were to put two images side by side, one Kentmere and one Tri-X, it would be hard to tell the difference.

If you are wondering if Kentmere 400 is worth adding to your creative workflow I would say it is absolutely worth it. Your mileage may vary, but I wouldn’t hesitate. Load it up and get out and shoot.

What are Print Editions?

If you have been looking into purchasing a fine art photograph you may have noticed that many times a photographer will label the prints as limited edition or open edition or even non edition prints. What does all that mean? What does it have to do with the photograph you may be purchasing and how does it affect you? Let’s take a look.

Unlike other forms of visual art, photography (and sculpture in some cases) can make many copies or versions of an original. Paintings are different. Sure, you can make a copy of a painting and sell posters, limited edition prints etc. but you can hang the original on the wall and there is only one original. With a fine art photograph the final product isn’t a negative or a digital file, it’s the print. However, the print is where the last portion of the creative process is done by the artist with photography. This makes photographic prints inherently reproducible making it impossible to have an “original”.

With that said, fine art photographs are made, not taken. Much more than a press of the shutter button goes into the creation of a final photographic print.

Limited Edition

A limited edition simply means that a photographer has decided they will only produce a set number of prints for a particular image. It is a promise to the collectors, that the photographer will only produce a limited number of prints. For example, a photographer may decide to only produce 10 prints of the London Bridge. Each print is numbered 1-10 out of 10 i.e., 1/10, 2/10. Therefore, it is called a limited edition.

If a photographer limits their prints it puts some responsibility on the them to maintain provenance of the edition. This means the photographer needs to keep records of all prints made and sold. This should include who the original purchaser is, what number print of the edition it was, and any other details. By doing this the photographer can prove the value of any print that is purchased by a collector. Of course with any print an artist should provide a Certificate of Authenticity (COA). More on that later in this post.

A Time and Place. Limited Edition Silver Gelatin Print, 1 of 10, signed by the artist. Exhibited 2015, Littleton Museum, Littleton CO.

There are some pro’s and con’s to this approach. The big upsides to collecting limited editions is that there is only so many of these objects created. This automatically creates value if the print is popular. This also depends on the number of prints in an edition. If a photographer prints 200 in an edition, then, in my opinion it’s not that scarce and the chances of most photographers selling out an edition of 200 is rare. However, if a photographer prints 20 in an edition, then the value of each print should be higher. If you are a collector and can get in early on a limited edition the value of the photograph has a likelihood of continuing to hold it’s value. Not to mention the uniqueness of owning such a limited supply of the print.

Singed and Numbered

On the downside, there is no guarantee that the print will hold it’s value. Also, for the photographer, this really limits their ability to create more prints if the photograph becomes popular, painting them into a corner. Many times a photographer will raise the price of a print as the edition sells. This makes sense because when a print is popular, the edition has a good chance of selling out. If the photographer has limited availability to sell the print they can gauge value by how well it sells, maximizing their potential profit from the sales.

Open Editions

When you buy an open edition print you should be getting the same quality, and attention given to the print as a limited edition, BUT there is no limit on the amount of prints the photographer is going to make. With open editions, certificate of authenticity, artist signature, purchase price and number of print should all be provided with the print. This still lends provenance to the print just like a limited edition except that there is no end to the print run. It could be a very popular photograph and be printed 800 times or, not so popular, and printed only 5 times.
I feel that open edition prints are a good middle ground for both the photographer and the collector to get into collecting photographic fine art prints. It let’s an early or mid career photographer to find out what work is most sought after and collectors to get in on a print when they have the budget to purchase.

If a mid career photographer sees success and starts to be heavily collected or represented by a gallery, the photographer can stop producing open editions and move to limited editions. If a photographer keeps good records of who has purchased open edition prints he or she can contact all the collectors notifying them that the open edition has been closed.

Non Editions

This is simply a print that is sold without any provenance or documentation. Many times without an artist signature. To a collector these are not as desirable. Sure, it may be a fantastic photograph, and if you love it buy it! If it brings you joy and happiness when you look at it that is the most important, but it probably won’t be something collectable. If you enjoy photographs and don’t really care what their value will be, but you want it hanging on your wall, then non edition prints are a great way to go for adding some interest to your home or office. Don’t let it stop you from buying one.

Certificate of Authenticity

When purchasing any time of art a collector should expect to get a certificate of authenticity (COA). This is a detailed account of the origin of the artwork. It should state the artists name, title of the work, dimensions date the print was issued, what number in the edition, signature, as well as other pertinent details.

The COA is a very important part of purchasing a piece of art. Without it, the artworks value is much less.

What About Me?

For now, I provide my collectors with Open Edition black and white fine art prints. I am not represented by a gallery at this time, so I don’t really see the need to put limits on my print numbers. I feel that this is the most flexible approach for me as a photographer, and still provides a high level of value to any collector who purchase prints from me. If things change in the future I may close an open edition but for now they are open.

If you want to purchase a print from me please inquire. Soon, I will have online purchasing at my website.

Hopefully this was some helpful information for you as you begin your photographic collecting. As Always, if you want to be kept in the loop, sign up for my email list. I send info on new prints, exhibitions and general happenings so you can keep tabs on the latest.

Keeping it Simple

Last summer my wife and I made it back to Montana to visit some friends and hang out in the area we used to live in. There were a lot of things to do, people to see and general catching up. I didn’t really make big photo plans for this trip so, photographically speaking, I packed pretty light. Limiting myself to my 35mm camera, a couple lenses and a few rolls of black and white Tri-x we hit the road for Montana.

We were able to spend a week with some close friends on the Gallatin river just outside Bozeman and hit all of our favorite restaurants. Our dog was in heaven again. Being able to roam freely along the river and hang out in the sun whenever and where ever she wanted. It was a very relaxing time.

Photographically, it was a place I had been many times before, for some reason I wasn’t really inspired to make photographs. Maybe because it felt so familiar. Not really sure, because it is a beautiful place to photograph.

Simple black and white composition of bridge at Sacagawea Park. 35mm, Tri-X, xtol 1;1

With a few days left in our trip we moved to different accommodations. We booked an Air BNB “down the hill” in Livingston, MT. I had been there many times but I hadn’t spent more than a couple of hours there at a time. Mostly to go get some lunch or dinner at one of the great places in town. My wife had plans that took her away from town for those few days leaving me without transportation, so I was relegated to hoofing it around town on my own.

At the edge of town, along the banks of the Yellowstone River, is Sacagawea Park. I had not spent much time there before, but it was pretty close to where we were staying so I decided to explore it a little. While shooting black and white photographs I look for simple compositions, I wasn’t really looking for an epic view of the mountains. (The forest fires were raging then and the sky was filled with smoke anyway.) I was able to isolate a few of the charming features of the park while I explored. One of them being the bridge that accesses the park.

The final photo turned out pretty much like I wanted. It has the calm feeling I wanted to portray with the still water reflecting the arches of the bridge and the discovery of peaking through the woodland to find the old bridge just beyond the water. Keeping the composition and gear simple when I made the photograph, it helps me remember the sounds and smells of that day when I made it. A very good memory.

Wilderness at your front door

Like most people I have a day job. Photography is my passion and I am lucky enough to be able to make the kind of photographs I want to make on my terms. However, the day job does sometimes cut into my available time to shoot as often as I would like. So I have to be creative with my time.

Recently I relocated from Montana to Minnesota. Some of you may be saying “What?…” I know. Minnesota is not known for it’s grand vistas, towering mountains and crazy cool wildlife. But it isn’t that bad actually. I haven’t been able to explore much yet, due to Covid-19, starting a new job and renovating a really old house.

I wasn’t going to give up though. I work from home, like a lot of folks nowadays, and my new home office is in the basement. It has a garden level view window right in front of my desk. Little did I realize what a perfect wildlife blind this window would be!

A cardinal couple stops by my window often looking for food.

Many times I have early phone/zoom meetings with my colleagues in Asia so I am often at my desk before the sun rises. My home is in a heavily wooded area right next to a huge lake (duh, Minnesota) and I started noticing that many mornings when I was on the phone all sorts of animals were roaming around my garden. They had no idea I was sitting there watching them!

I thought to myself, “here is my opportunity to photograph some wildlife!” I started having a camera with me on my desk every morning when I started work. While I am on calls, muted of course, I can shoot away at all the critters that come by my window. It’s really fun and a challenge.

One of the visiting foxes that stop by my window on their hunting rounds in the morning.

I have the usual squirrels and chipmunks that come by. They have even started to look into the window at me like I am some sort of zoo exhibit for them! Then there are the herds of deer and beautiful birds that stop by. The highlight of my “working” wildlife blind has been the red foxes. They have been really fun to photograph.

Now many of these are not going to be national geographic images. Most are snapshots at best. But I have had a few keepers that I enjoy and have added to my collections. The point is I had to find a way to keep my creativity and my eye exercised to keep making photographs.

The Camera Doesn’t Make The Photographer

Many times I get a comment from someone who sees my photographs like, “Wow, that’s a beautiful picture. You must have a really good camera”. It is common for people, who don’t understand what goes into creating a photograph, to think all a photographer does is frame, focus and push a button.

Also, I get many friends asking me what is the best camera they should buy. This is what leads me to the topic of this post. The camera doesn’t make the photograph. The photographer makes the photograph and the tool is a camera.

It is interesting to me when people think the camera made the photograph. No one asks the chef at a restaurant what type of oven they use, or tell a textile artist they must have an amazing loom.

Rainy day on the streets of downtown Denver. Canon sure shot point and shoot with Kodak black and white film.

Here’s the thing… it doesn’t matter what type of camera is used to make a great photograph. What DOES matter is knowing what kind of photograph I want to make. What is the creative vision? That’s where a photographer starts. I ask myself these questions before I make some photographs.

  • What is my end goal for distributing the images?
    • Big prints
    • Family scrap book
    • Social media
    • Magazine
  • What am I trying to say with my photographs?
    • Tell a visual story
    • Create emotion with the photographs
    • Capture memories
  • What am I photographing?
    • Landscapes
    • Sports
    • Travel
    • Portraits
    • Street

Thinking through some of these questions helps me figure out what the best tool (camera) is to achieve my creative vision for the photograph. For example, if I plan on shooting grand landscapes my needs are very different than when I am shooting candid street photographs. For the landscapes a high quality lens, large sensor/film system could be important. (Unless the goal is to shoot soft ethereal, interpretative landscape photographs. Then a Holga camera may be perfect.) In the case of a street photograph a simple fully automatic point and shoot camera may be perfect for the quick indiscrete capture.

Long exposure of Boulder falls taken with an antique Kodak folding 620 camera

Today’s cameras are awesome feats of technology. So many features that can meet almost any need. Almost. The only things a photographer needs in a camera is the ability to control ISO, shutter speed, aperture and focus. That’s really it. But all cameras have their strengths and weaknesses and knowing what those help me know what camera to use to make a photograph that I am after.

Don’t forget to sign up for my monthly email below. I will have exclusive content and offers for email subscribers not available anywhere else. Thanks for your support.

Back in the Swing of Things

Black and White photo of Union Station in Denver Colorado

It has been a while since my last post… a long while. In the last few years I have had some very distracting life interruptions. Yes, Covid-19 has affected us all, and many have been greatly impacted. My thoughts and prayers are with all people who have suffered in this time. Beyond Covid-19 I also moved twice, once in the same town and then across two states. I have started a new job as well. Needless to say with all of that happening my photography, and this blog, have suffered from neglect.

Now that I am settled into the new job, I have picked up my cameras again and hit the keyboard. I have a few ideas that I want to implement this year too. Some ideas on subjects to photograph etc. One of them is to start a monthly newsletter. It will contain special content that is not on my social outlets or this site. If you want to get more details on what I am up too and the new work I am producing, sign up below in the Email Newsletter form at the footer of each page on the blog.

Street Photography on a Budget

Now I am the first to admit that I am not a very good street photographer. I do enjoy it and I am getting better each time I go out in search of that “decisive moment”. I have read a lot of other “how to” and “best gear” blogs and articles about shooting street photos and there are some really great tips and tricks out there. One thing I have learned over my course of photography experiences is that there is not a hard rule on much of anything in photography. (Except exposure. A bad exposure means a bad photograph no matter what else is going right in the photo.) So I take every “do this” or “use this” tip with a grain of salt.

Many of the things you may find online about street shooting is focused around the gear. It seems that the holy grail of a street shooters bag is a Leica of some sort. I don’t know about you, but I can’t really justifying the cost of a Leica to do some occasional street shooting. Of course many street photographers use their phones, which is a good option, and others use mirrorless systems. It seems that what ever you end up using you must like and be proficient at using it. My point here is that you don’t have to spend a lot of money to be able to make great photographs. The best camera is the one between your ears.

Monica's Pizza, one of the best pizza places in the North End of Boston
Monica’s Pizza, one of the best pizza places in the North End of Boston. Shot with Canon AF35ML and Kodak Tri-X 400

I am partial to traditional film photography methods, especially Kodak Tri-X 400 for street photography. So, when I was planning a trip to Boston last year I wanted to find a film based camera that I could use to make some walk around town photographs. I wanted something small, easy to use and cheap. I have a few 35mm cameras I could have used like a Pentax ME Super, or a couple of Nikons and even an Yashica Electro rangefinder. All of those, except the ME Super, are too big and imposing on the streets when you want to photograph strangers on the street. I needed something smaller and less intimidating.

Unfortunately my Olympus XA just bit the dust and quit working on me. I loved that camera. So with that, I decided I was on the hunt for a high quality point and shoot film camera. With this in mind I kept my eyes open anytime I went into a thrift store or an antique shop. In the 80’s and 90’s there were some stellar point and shoot cameras made. Many of them are still highly sought after even today. Cameras like the the Olympus XA, Contax T3, Yashica T5 and others are stellar examples of great point and shoot systems. The fun part about looking for one is that many people think they are out dated and are “no good” any more because of the new digital systems out there, and they just give them away. I found my Olympus XA for $2 at a thrift store because someone gave it away!

Canon AF35ML point and shoot camera for street photography

My efforts didn’t turn up a Contax but I did get my hands on a pretty capable camera at a thrift store. I picked up a Canon AF35ML in almost perfect condition for $10 bucks. It fit my requirements perfectly (almost, I will talk about that in a minute). It was cheap, small and was a “full frame” 35mm camera. I could slip it in my pocket and use it whenever I needed. Even better, my family that was traveling with me, didn’t have to put up with the “wait while I get the camera out” moments. I could just pull it out, point, shoot and be on my way.

Now, for some film. I wanted to use a bullet proof black and white film that could handle any funny exposure issues I might run into with this little point and shoot rig. One of my go to films is Kodak Tri-x 400. I knew I didn’t have much control over what the camera was doing so I needed a film that had a lot of exposure latitude. Another film I could have used was Illford HP5. It is very similar to Tri-x.

One International place boston
One International place Boston. Night shooting was no problem for the point and shoot with Kodak Tri-X loaded.

Once I had some film loaded I gave the little camera a spin… The auto focus was fast and smooth and the shutter has a nice quiet “click” when you hit the button. However, the film advance sounded like some sort of electric grinder, “grrr…ick”. So, there was no way I was getting away clean from some street shot of someone walking by me on the street. Bummer. The noise aside, the images this camera produced were fantastic. With a little practice I quickly understood where this camera excelled and where it falls flat on it’s face.

Puddle reflection
Puddle reflection

I still use this camera for street snaps and general travel/walk around shooting. My whole point here is that you don’t need to spend a ton of money to make some great photographs. I spent a total of $10 for the camera and about .20 cents a frame to shoot some fun street images. No Leica needed.

Behind the Shot, Ruins of Cape Romano

DomeHouse
Dome House off the Cape Romano coast in Florida is reclaimed by rising oceans and strong hurricanes.

In my professional life I am a technical consultant for a cloud computing company.  I spend most of my day in front of a computer screen and on the phone with customers talking about their enterprise wide computer woes. Whenever I get a chance to follow my passion for photography I take it.

One of the benefits of my day job is I have the opportunity to be sent on business trips to some pretty cool places. For one of these trips I traveled to the Fort Meyers Beach area in Florida for a software conference. I was excited to have the chance to capture some images in a coastal setting during my free time. Being landlocked in my home base of the Rocky Mountains I don’t have a lot of opportunity to photograph on the coast. With my destination scouted via Google Earth I packed up my trusty Mamiya 645 kit and headed to the beach. Ready to capture some sand and surf images.

There were several group entertainment options for this conference. Golf, fishing, karaoke, etc. One of the activities was a short boat ride to Romeo Island for some beach combing. Now I’m not a shell collector but the idea of a boat ride to an island sounded like fun. I thought, “I could take my camera gear and get some nice beach and surf photos while everyone else has their nose in the sand looking for shells”. That was the plan… I couldn’t have expected the surprise that awaited me when I got there.

DomeHouse
At the time this photo was made (2012) the Dome House was still on a small island off the shore of Cape Romano.

On the boat ride everyone was dressed for the occasion. Shorts, flip flops and sun glasses. Then there was me, with my photo back pack, tripod strapped to the side looking like I was prepared for a 3 hour cruise. After a short ride we arrived at what the captain called “Romeo Island” and beach landed the boat on the east side of the island. Everyone scattered to stake out their prized beach combing claim, except for me.

I needed to separate myself from everyone else so I wouldn’t bother anyone while I was photographing. I took off across the small sandy island to the west side. Weaving through the palm trees I came out on the other side on the beach. I looked left and then right… and there it was! Some sort of dilapidated building, left behind for the ocean to reclaim. I could hear some of the other people from the cruise making it around the bend on the beach. I hurried to set up my camera.

DomeHouse
Constant waves and tidal cycles have destroyed the island this house used to sit on since 2012.

I figured I had about 10 minutes before the beach combers were going to be at my location and all over my newly found subject. I was happy to be able to get a few frames composed and exposed before the rest of the group made it over to the ruins. Cell phone snaps were made and then they all started back along the beach to the boat with their heads down, looking for the next treasure to be found. I thought “Great, I can get a few more shots and head back through the middle and meet them at the boat.”

With my final shots taken I packed up and huffed back to the boat while the rest of the group was loading up. Being the last one back on board, everyone asked how my pictures turned out. I told them all that I shoot with film and wouldn’t know until I processed them when I got home. That started some great photography conversations for the ride back.

Dome house of the Cape Romano coast in Florida is reclaimed by rising oceans and strong hurricanes.
Today, the Dome House sits 100+ yards off the cost of Cape Romano and is almost completely covered by the ocean.

As we headed out, the captain pulled out some old photos of the ruins in its heyday. The photos he shared showed the unique house set back, hidden among the palm trees. Apparently, an oil developer had built the house some time in the early 80’s. When it was built the house was actually part of the mainland, not on an island. Over the years and several hurricanes later, that part of the mainland washed away and became a little sandy island. When I was there the house sat halfway in the water, but today this house sits almost completely underwater and the island is totally gone.

I was so happy that I decided to take the boat to “Romeo Island”. These are some of the most unique coastal images I have ever captured. Photography has taught me to expect nothing but be ready for anything.

Choosing a Composition

Last January, while is was planning my trip to Australia, I was really looking forward to some great opportunities to photograph the opera house in Sydney. In one of my previous posts about being prepared to photograph while traveling I talked about how I tried to plan and be prepared to photograph the opera house during a fireworks display. Needless to say it didn’t work out as well as I had hoped. I was in luck though, I had a few other ideas in mind for photographing the opera house and a few days to get it done.

The opera house is one of those famous landmarks that is photographed all the time. Thousands of people take photos of it. Because the vantage points available to shoot the opera house are limited, many of the photos look the same. I wanted to capture my vision of the opera house, not just the same photo everyone else had. Don’t get me wrong, there are a lot of fantastic photos of it, but I wanted to look hard for something different. Something that was mine.

Storm over Sydney Opera House
Storm over Sydney Opera House. Pentax ME Super, 24mm f2.8, Arista.EDU 400 ISO film

With several days to make my photos, I was able to watch how the light moved throughout the day. I could follow the weather to see how it would change the scene. I got a pretty good sense of the rhythm of the harbor while I was there. Armed with my observations I knew a distinct image would come down to composition.

I always edit my composition in the view finder. Simplify, simplify, simplify. Making sure there is nothing in the composition that did not need to be, is always my goal. I loath cropping my images. For a wide angle shot I had to wait for many of the boats to move clear of my composition. Using a long exposure made for an exercise in patience. Composing for simple lines that create a restful image, is another thing I always try to achieve. Thanks to a great coastal line and the fantastic architecture it wasn’t hard to see for the opera house.

Sails of the Sydney Opera House
Sails of the Sydney Opera House. Pentax ME Super, 24mm f2.4, Arista.EDU 400 iso film

Changing up the composition a bit, I wanted to get the pattern and lines of the architecture of the building itself. Almost an abstract view of the opera house. Maybe this isn’t a very original image but the haze in the air made the sky turn to a creamy white that complemented the white rooftops of the opera house. This high key image removes any distraction and lets the viewer focus on the repetitive nature of the lines in the architecture. Repetition in design.

Overall I am really pleased with the images I was able to create from this trip. There were many that didn’t make the cut but a handful of them are real keepers.

Impacting Images from A Small Format

I was lucky enough to be able to take a trip to Buenos Aires and Sydney Australia last January. I was traveling for business and had to pack light. If I had my choice I would have left the suit coat and business attire at home and brought my Mamiya 645 gear with me. Considering the level of meetings I was to attend, that was not an option.

Being selective with what gear I was going to take with me was going to be tough. Considering I had never been to either Buenos Aries or Sydney before I didn’t really know what to expect or what to plan for. Because I was going to have to keep my gear to a limit, I would be packing a 35mm kit to save on size and weight.

SyndeyHarbor2016_605_SMALLDowntown Sydney Australia, Pentax ME Super, 24mm Lens, Arista.EDU 400 ISO film

The smallest 35mm body I have is a Pentax ME super. It is a really compact camera with a great automatic exposure system as well as full manual control. All in a package as small as a Leica. I love to use this camera for street shooting too. Not to mention I just love the sound of the shutter on this little gem. With the decision made of what camera to take I had to whittle down what my lens choices were going to be.

I knew that my opportunities for photography on this trip were going to be limited to late evening or well after dark. I was hoping to be able to shoot some wide cityscapes but I wasn’t sure how close I could get to the subjects that I wanted to photograph. Also, to make sure I was going to get the most out of a small 35mm negative, I knew I had to stick with prime lenses. I couldn’t afford the distortion of a zoom. With all of that in mind I chose to take my 24mm f2.8 wide angle and my 50mm f1.7 prime lenses. Both small and light.

BuenosAries2016_626_ShareDowntown Buenos Aires Argentina, Pentax ME Super, 24mm Lens, Arista.EDU 100 ISO film

For film I wanted to use something that could handle the contrast of night photography and show some texture but not too much grain so I would have enough to work with when enlarging to a big size print. I decided to go with Arista.EDU films, both 100 iso and 400 iso. I really like the classic structure of the image that this film produces. I could have chosen one of the T grain films but thats for another post.

Finally, I had to pick a convenient tripod that would fit in carry on luggage and make sure I had enough batteries, shutter release and any filters I might need.

Between the two cities I was able to expose 6 roles of film. I just happen to be in Sydney for Australia Day (like 4th of July in the U.S.) and got to celebrate with millions of people in downtown Sydney. It was a blast, I just loved the Australian hospitality. Overall I am very pleased with the images I have from the trip. You can see a couple here in this post. It was a great trip and I have several more posts to come with some other images from this trip.